SCRIBBLE.SO
Best Writing Software For Novels + 8 Tools
We’re going to help you get started with the best writing software out there for authors looking to improve their productivity.
![]() Software version 1.8.0
Software version 1.8.0

The Best Writing Software Helps Authors Create Better Books… Quicker.
In this tutorial, I’m going to walk you through the process of getting started with Scribble’s writing software. This software is specifically designed to help authors create more engaging books. I’ll outline 8 different writing tools within the software designed to help you write better books as well as get your books completed on time. So let’s jump in.
Writing Software: Getting Started
After logging in your first time, simply click on “add new book” in the upper left corner. In the video above you’ll see that I gave my book a title, set the type to novel, set the draft to first draft, and then set my target word count to 60,000. You can click the little icon on this popup to see the average word count of different types of books as well as a handful of examples. Next, in the video above, you’ll see that I set my book summary and uploaded my book’s cover.
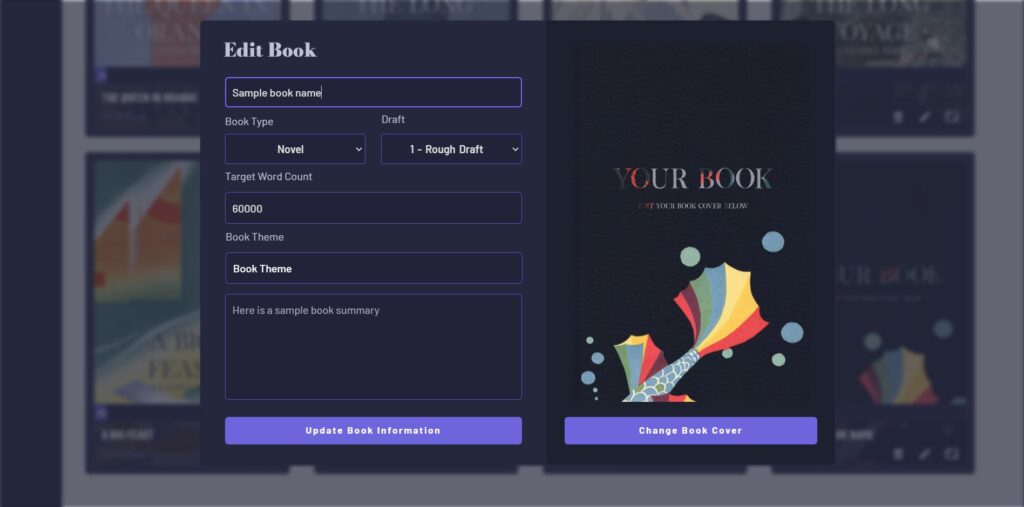
Now, with my book added I can access my book anytime on this page, or edit the books’ details, by clicking on the edit button on my main book’s page.
But for now, let’s click on the book to go over to the books main writing page. This is where you’ll spend the majority of your time. To get started on a new book you need to add your first chapter.
Adding Chapters
In the video above, you’ll see that I can give my chapter a title and a chapter word count target. Now by default it’s set to 2500, and that’s because we set our book target to 60,000. If our book had 24 chapters, which is a common chapter count in commercial novels, each chapter would need to have 2500 words. However, you can set this to whatever you want, and if you’re looking for a reference you can click on the icon on this chapter popup to see the average chapter word count of famous books. Also, as a sidenote, you can always use our 24 chapter plot template if you’d like to get started quickly.
Next, I’ll give my chapter a number and set its act. Scribble uses a three act structure, which is simply:
Act I: Represents the beginning
Act II: Represents the middle
Act III: Represents the end
However, we split up act II into two parts, because often, in the first half of the second act, the protagonist is passive and reactionary, often playing a bit of a victim. Then, in the second half of the second act, the protagonist often becomes more proactive in the pursuit of their goals. And for this reason, we split up act II into 2a, and 2b.
One great feature of Scribble, is that when you select an act, over to the right, you’ll see chapter suggestions. These are just meant as suggestions, if you need guidance when it comes to story structure or what to do next. These chapter ideas change based on the act you’re currently in. If I’m in act I, I’ll see act I writing suggestions Here.
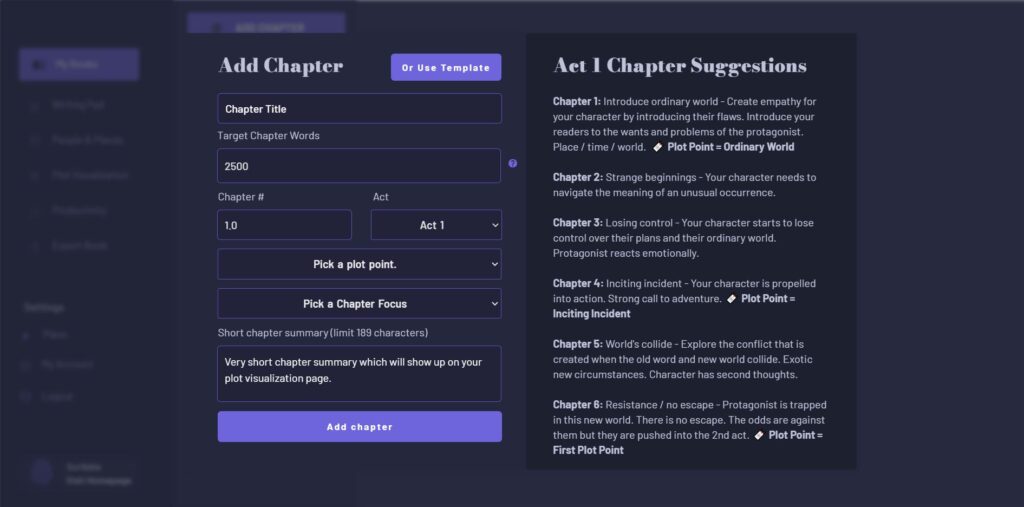
Next, we need to pick our chapter number and plot point, or if it’s not a plot point, we’ll select “not a plot point”. In this case, because it’s our first chapter, we’ll select “ordinary world” which essentially, is where we introduce our audience to our main character and their world.
Next, we’re going to pick a chapter focus. Because we’re on the first chapter, we’ll select “setup and intro”. Essentially, what this helps us do is makes sure we’re doing the best job as writers for the main goal of the chapter. If the chapter is a battle chapter, is it the best battle possible, or if it’s a negotiation scene, we can ask ourselves, is it the best negotiation possible?
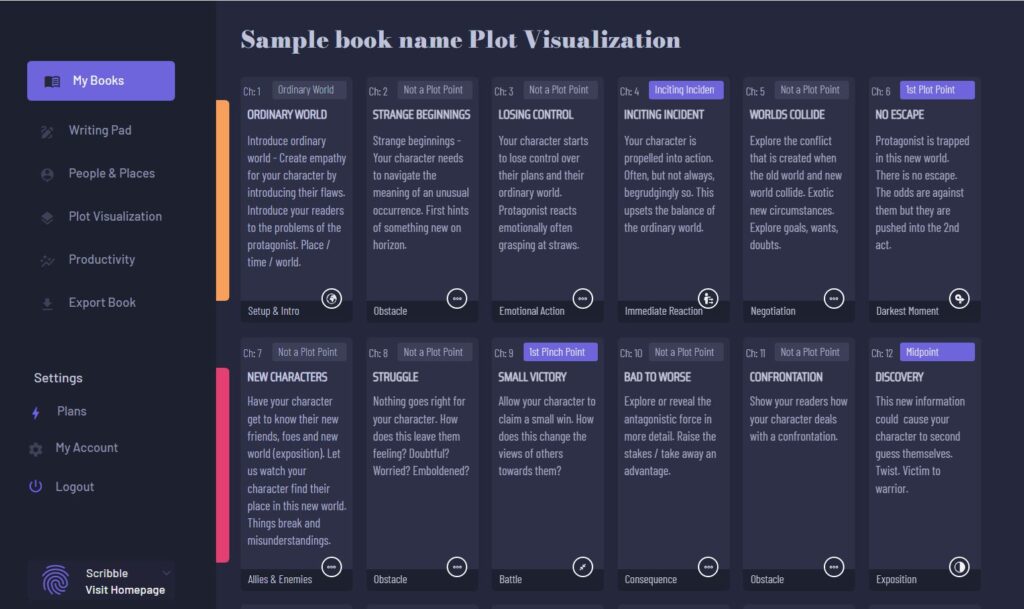
Next, we have a spot for chapter summary. This is important to fill out because this summary, which needs to be short, will show up on our plot visualization page. It will give us an at-a-glance snapshot of how our chapters relate to, and flow in and out of each other. Here is a screenshot of the plot visualization page:
Next, we can click on “add chapter.”
Sidebar Vs. Topbar
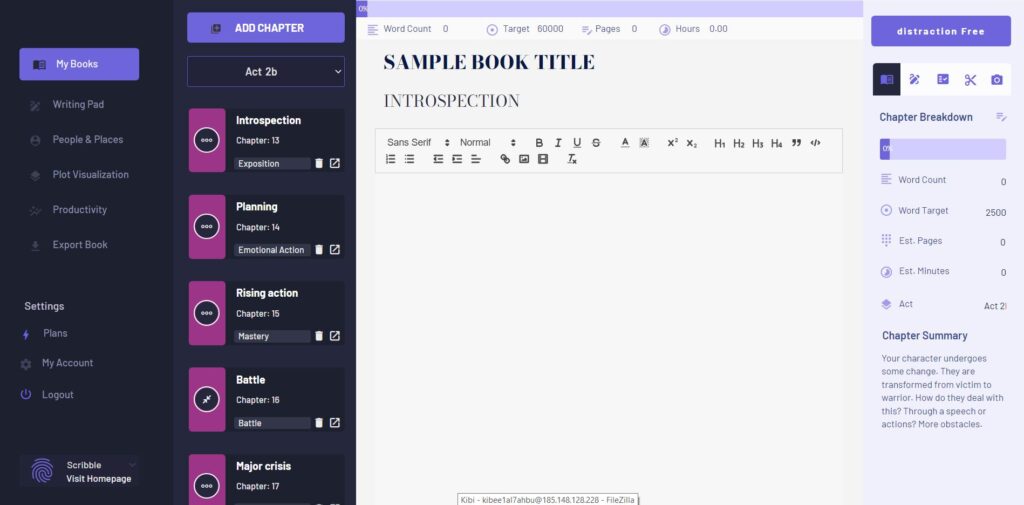
Now let’s look at our sidebar and topbar. In a nutshell, our sidebar contains information relating to the chapter, while the top bar contains information relating to the overall book. Here is a screenshot:
So let’s start by talking about the sidebar.
First, if you ever need to edit chapter details, you can do so by clicking on the “edit” icon within this sidebar. Under that icon you’ll see details relating to the development of your chapter.
You’ll see:
– Your current chapter word count
– Your current target word count for this chapter
– The estimated number of pages contained within this chapter
– The estimated time in minutes it would take a reader to read this chapter
– And the act that this chapter belongs to
To help you visualize your progress towards your chapter word target, you’ll also see a chapter progress bar that updates as you write.
In order to update any of these stats, simply click anywhere outside of the text editor.
This is helpful because it helps you zero in on these smaller, daily chapter goals, which helps you stay motivated even when this “total book completion progress bar” up at the top moves slower. These two progress bars essentially give you a zoomed in, chapter level perspective while allowing you to zoom out and keep your eye on the book level progress as well.
The Tabs
Notice in the screenshot above, that there are also multiple tabs which help you keep your chapters organized.
The first tab is our scratch pad. This is where we can put any top level thinking or notes we want to remember.
Next, we have our chapter checklist. Now, not all chapters will have the need to have all boxes clicked, but it’s a helpful checklist to remind you of what needs to be done. For example, if I scanned my chapter for adverbs and adjectives that I could replace with better suited and stronger verbs, I could check this box. If you don’t know what a checklist item is, simply click on the text and a dialog box will popup telling you about this checklist item.
Beside our checklist we have our “cut notes”. Now this is similar to the scratch pad, but here, rather than placing top level ideas, we can actually place cut text from our chapter, which we’re not sure will make the final cut. For example, if I’m on the fence about removing a paragraph, but I don’t want to totally lose it, I can just cut it out and paste it in this “cut notes” section and I can always come back to it later.
Then, lastly, we have our media section. Here you can upload visual inspiration to help you with visualizing your characters or world.
Next, notice that we also have a “distraction free” button (top right corner) which allows you to write without seeing the other elements on the page.
The Top Bar
Next, we have the top bar. This is where book level progress is displayed. Essentially, it’s the cumulative data of all of your chapters together. So here, we’ll see our total book progress, our current word count, our target word count, or total number of pages across all chapters as well as the total reading time of all of our chapters.
Now, in the middle of the page, you’ll see the writing area. Here, you can format the text how you like. For example, I like to set my font size to “large”. I also like to type “chapter 1” at the top and bold it, because when I export my book later, it will help me visually separate my chapters better.
Now, let me just add a few more chapters here quickly. Now, you’ll notice I have 4 chapters. Each chapter is color coded according to their act.
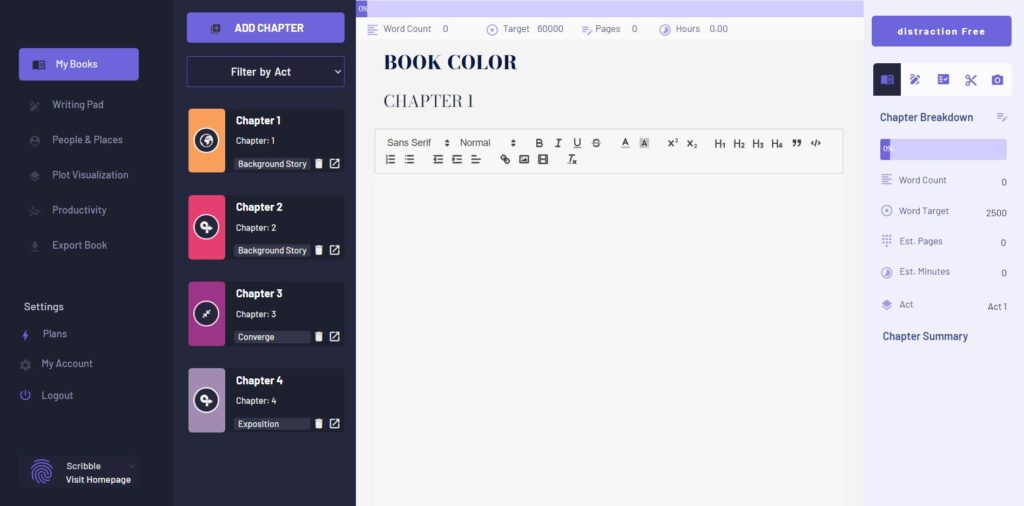
Also, if the chapter is a plot point, the plot points icon will show up in the middle of the colored boxes. You can always roll over it to see which plot point this chapter represents. If the chapter is not associated with a plot point, you’ll see an icon that shows a “…” symbol.
People & Places: Character Worksheets
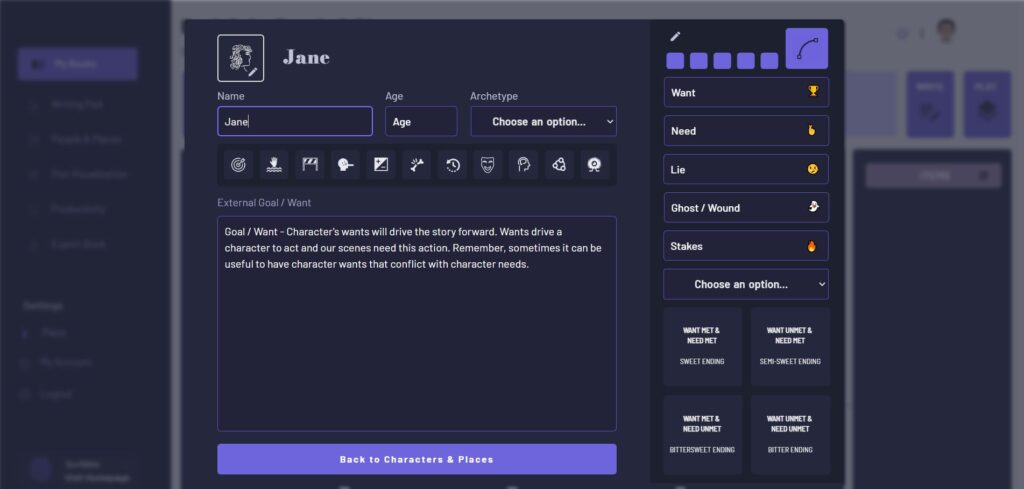
Now, with chapters added, let’s go over to the “people and places” link in the sidebar. This page allows us to add a third dimension to our world since it helps us add depth to the people and places that will make up our world.
Here for example, I can add a primary character, describe them physically, add a backstory as well as upload an image to represent that character. Now, I’ll be able to see all of my primary characters, secondary characters, places, events and even important items I want to describe. We have an entire tutorial on character development here as well as a breakdown of our 15 point character profile template here.
Plot Visualization
Next, let’s click on plot visualization. This is a really helpful tool because it gives you a bird’s eye view of your plot. Each plot card represents a summary of each chapter. Remember, previously we added short chapter summaries and now we can see those chapter summaries on this page here.
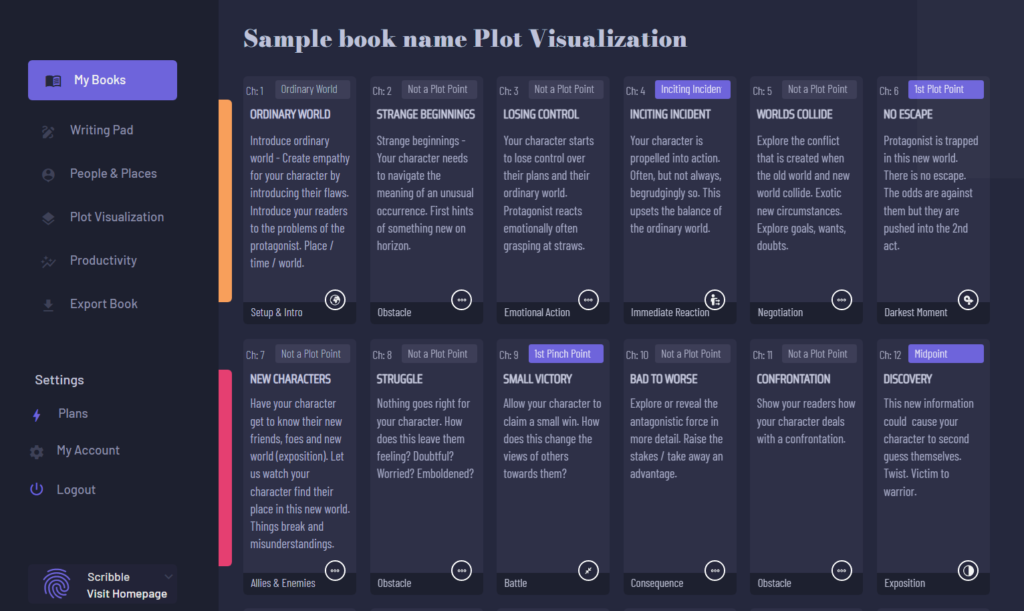
Okay, so here you’ll notice the numbers, titles and summaries of each chapter, and below you’ll be able to see the chapter focus and how they interact side by side. You’ll also notice that any chapter that is a plot point is highlighted in the upper right corner of the digital plot card.
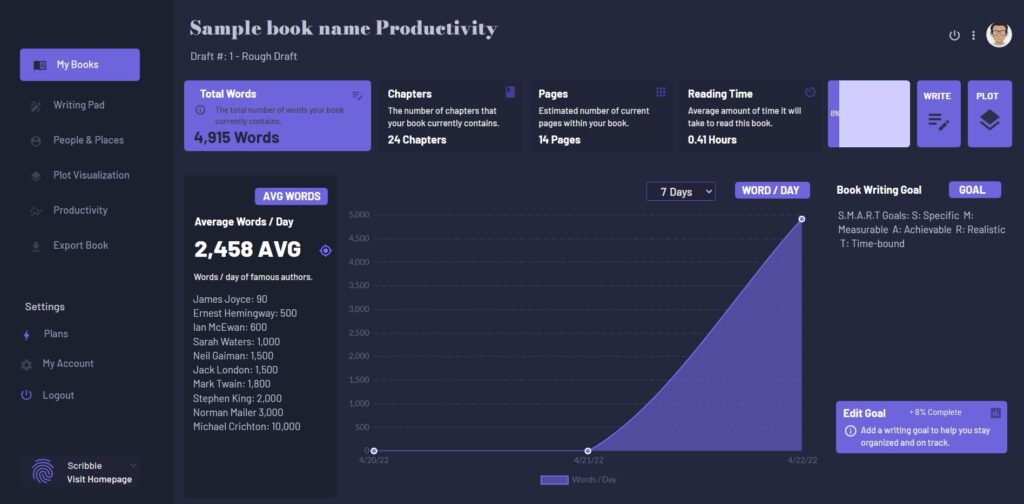
Writing Productivity Tools
Next, let’s look at the productivity page. Any day you log in and visit your book’s writing pad, scribble will start to monitor your daily progress. So here, you’ll notice I’m tracking progress over the last few days and here you’ll see my average words per day.
Export Book
Lastly, we can click on “export book” in the sidebar. Scribble is a writing productivity tool, not a publishing tool so we allow you to publish your book however and wherever you want, So on this page, you can see all of your chapters combined into one big book. Here you can simply copy the entire book to your clipboard and then import the book into whatever publishing software you want.
My Account
Lastly, let’s click over on “my account” in the left sidebar. If you’re currently on a 7 day free trial and you want to upgrade to our pro plan, you can do so by simply clicking on the payment button to add your payment information.
Writing Software Conclusion
So that’s Scribble in a nutshell and how you can use our writing software for novels to help you create better books faster. Now it’s time to stop watching this video and get to writing. You can sign up for a Scribble account here.
Good luck!

We Help You Keep it All in Your Head
![]() Software version 1.4.1
Software version 1.4.1
![]()
A software solution designed to help writers complete compelling stories.
 Version 1.8.0
PRODUCT
All Features
Pricing
Productivity
Story Structure
World Building
Character Building
USE CASES
Novels
Essays
Memoirs
Reports
Kids Books