
SCRIBBLE.SO
Best Writing Software For Authors – 2023
In this tutorial we’ll outline Scribble’s writing software and all of the amazing things authors can do within our writing application.
![]() Software version 1.8.0
Software version 1.8.0

Simply The Best Writing Software in 2023
Getting started with Scribble’s writing software is easy. In this tutorial we’ll walk you through some of the main writing tools within our software and we’ll link to other in-depth tutorials that will explain, in more detail, some of our other software features that will require a little more time to explain. So let’s jump in!
Scribble Writing Software Introduction
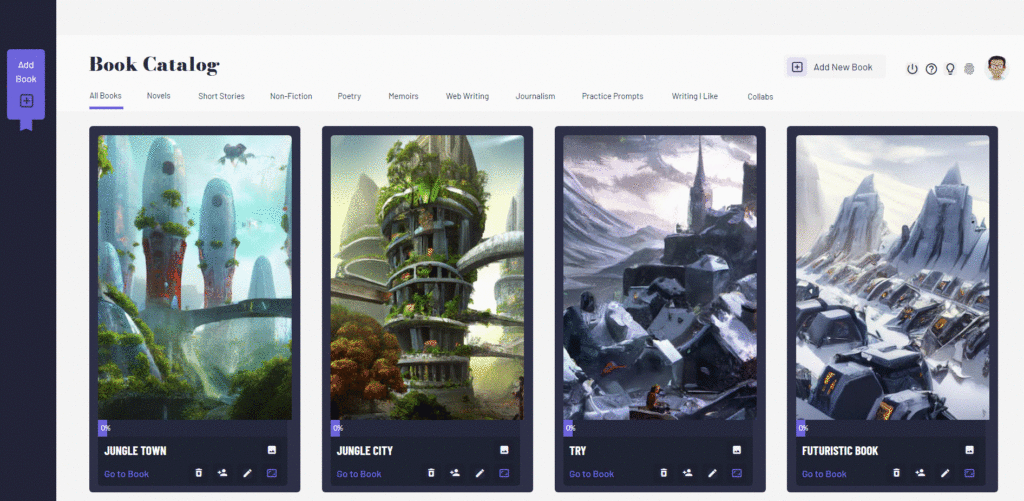
After signing into Scribble, on your main book page you can add a new book by clicking on “add new book” from the top right section of the page.
From here, you can give our book a title, a type and a draft number. In the image below you’ll noticed that I’ve set 60,000 words as my word count. You can change this if you want, but this is a good minimum word count for commericial fiction and non-fiction.
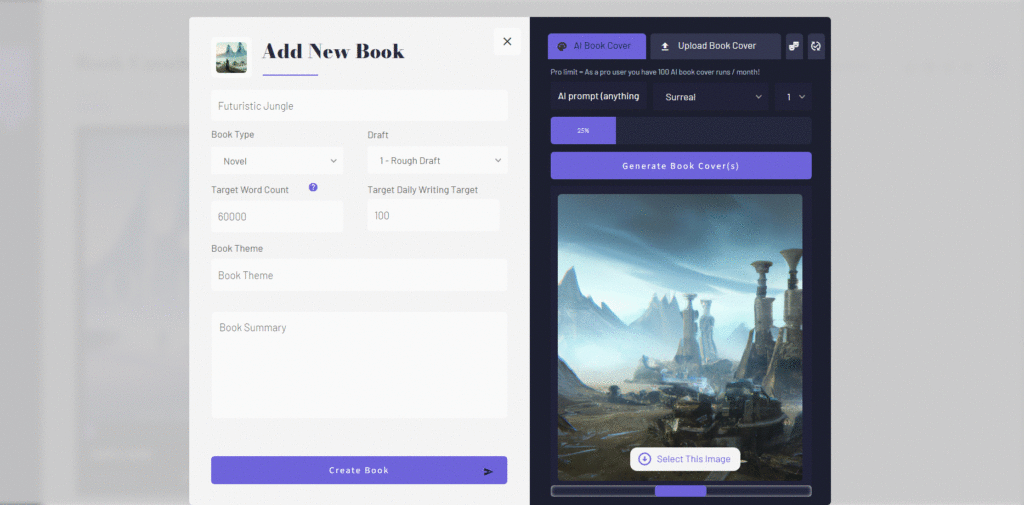
Now, over to the right, you can either upload your own book cover if you have one, or you can use the built in AI book cover generation tool (see image above).
If you don’t have a book cover or don’t want to use the AI book cover generation tool, you can just leave the cover section blank and we’ll generate a default cover for you.
But in this example, let’s use the AI book cover generation tool because it’s fun. For example, if you were writing a science fiction or fantasy novel, you might type in something like “futuristic mountain village in the amazon Jungle”. As an art style, I’ll just select “surreal”. Next, I’ll select the number of covers I want to generate. Keep in mind that free accounts are limited to a small total number of AI runs they can perform, where pro accounts can generate many AI covers each month. Here, I’m on a pro account so I’ll generate 5 covers using this prompt.
After a few moments, the results will show up and you can select your preferred cover by clicking on the button that says “select this image” (see image above).
Now you’re ready to click on “create book”.
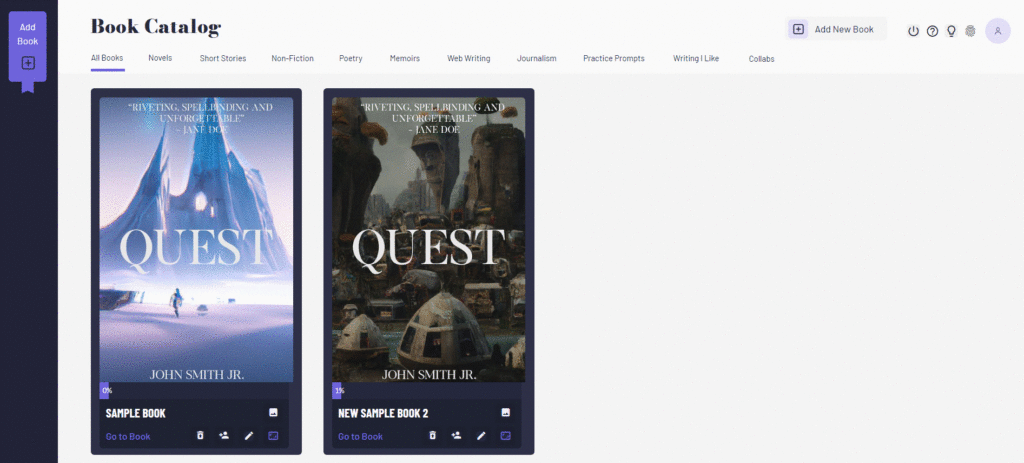
Now that your book is created, you’ll see it show up in your book catalog (see image above). If you wanted to edit any details about your book you could do so by clicking on the edit icon just below the book’s cover image.
Alternatively, If you wanted to change the associated AI book cover, you could click on the image icon below the book cover. Here, you could either download this image and then add text to it using your favorite image editing software, which you could then re-upload later, or you could simply click on “set as cover” to swap out your current cover with one of the other covers that were generated during the cover generation process (see image below).
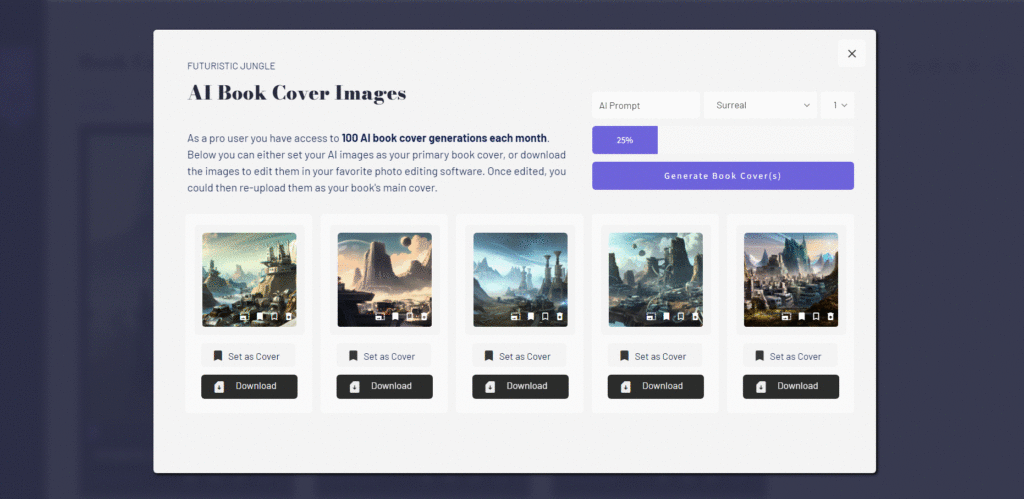
Similarly, you can always try to create new book covers by entering new prompts and styles in the top right section of this popup (see image above). All newly generated art will show up below.
The progress bar you see below the prompt area, will show you how close you are to your monthly AI runs. Be conservative with the number of book covers you generate, because you can also use these AI credits later to generate AI character avatars as well as worlds.
Writing Your Novel
Now, once you’re ready, you can start writing your book, by clicking on the book’s cover. This will bring up your “writing pad”, which you can always find over in the left sidebar as well.
![]()
Adding Chapters / Scenes
Now, we can begin by adding a chapter. Let’s get started by adding our first chapter. Here, I’ll add my chapter title, plot point, chapter number, tension score (which essentially, is a rating out of 10 ranking how much tension exists in this scene. Your climax will be rated a 10/10 and everything else will be scored in comparison to that tension level. Here, it’s our first chapter so I’ll select “1”).
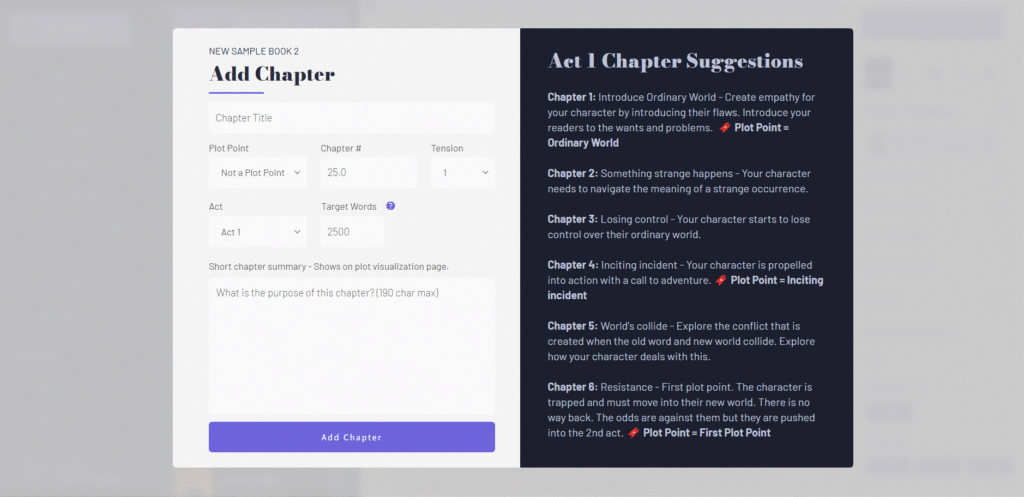
Next, notice as I change my “act” the chapter options change over to the right. This helps give you some general writing direction if you need it. Notice that we have acts split up into 4 parts.
Act 1 is the beginning of your story. Act 2a is the first half of the middle of your story. During this half your protagonist is generally a bit more passive. During act 2B the protagonist generally acts less like a victim and is a bit more active in going after their goal. Then act 3 is your story’s ending.
Next, I’ll add the chapter location as well as my target word count.
Lastly, I’ll add a short chapter summary and then click on “add chapter”.
Writing Your Book
Now that my chapter is added, I’ll be able to start editing my text, by clicking on the icon in the top right corner of any chapter card. To begin, I’m going to edit my font and font size. For my tastes, I’m going to set it to Alegreya and large.
Now, if I didn’t want to add my chapters individually, but instead use a plot template that will act as a plot planner I could do that too. Notice however, that because I’ve added a chapter, when I click on “add chapter” the template option won’t show up in the popup. That’s because books have to be empty in order to use this feature.
So let’s delete any chapters we have added. Now, when I click on “add chapter”, you’ll see this option for “use template”.
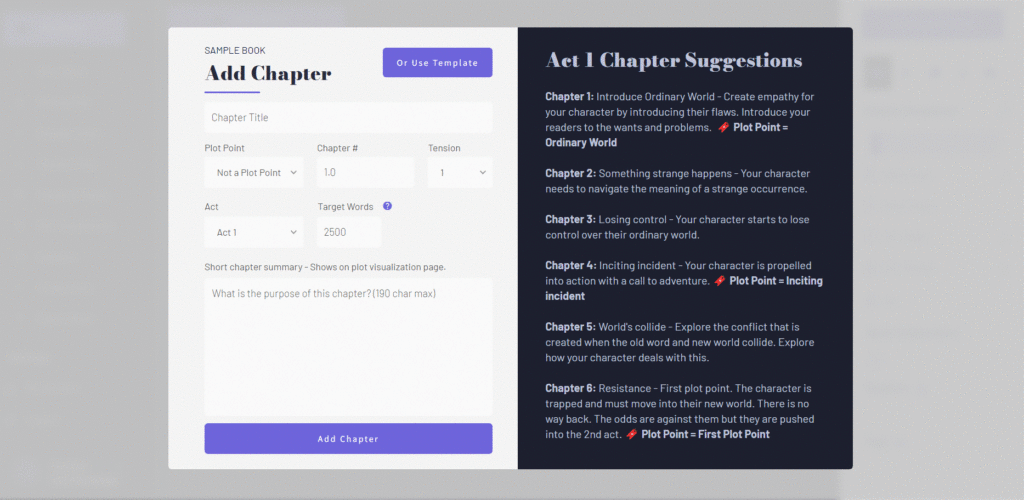
Now when I click on “use template”, my book will be populated with a 24 chapter book template, with a structure and summary general enough to give you a lot of room to fill in the specific details. And of course, you can change every detail of this template, delete chapters, or rearrange them as you wish.
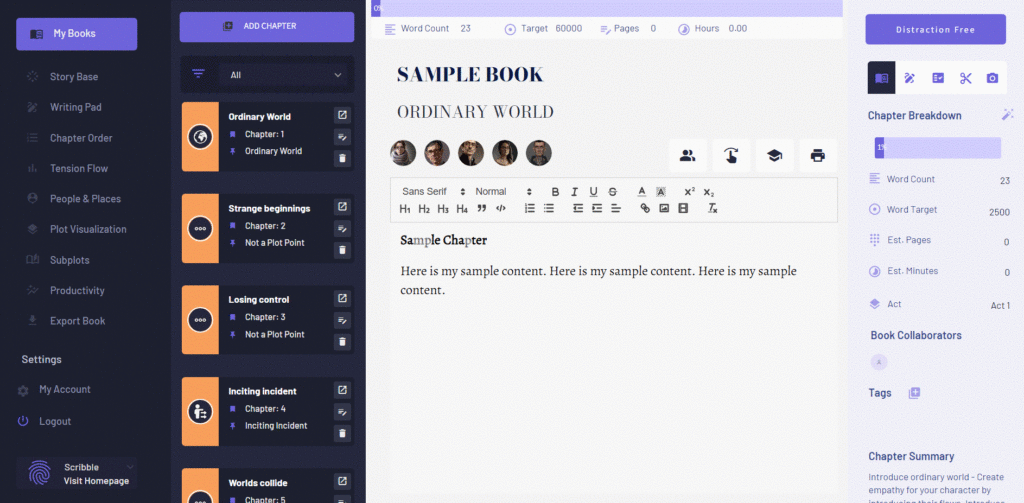
Writing Progress Tracking Tools
Now let’s click on a chapter and then over to the right you’ll notice that you can see a chapter progress bar. Since I set a target word count, everytime I write, then click out of the editor box, this progress bar will update. Look in the right sidebar in the image below under “chapter breakdown“.
![]()
You’ll also notice another progress bar near the top of the page, but the difference is that this progress bar gives us a zoomed out perspective by monitoring the progress of our 60,000 word novel.
The progress bar over to the right is our chapter progress bar and represents how far along we are in hitting our 2500 chapter word count goal. This gives us both a zoomed out as well as a zoomed in perspective. The chapter progress bar is helpful because you’ll actually see this progress bar move substantially on a daily basis. This can really help with writing motivation.
In the right hand sidebar you’ll also see your word count, target word count, estimated number of pages, estimated number of reading minutes as well as your book collaborators and chapter summary.
On the other hand, the top bar above the writing area represents your book level progress and top level details like your word count, number of pages and total reading time.
Also, notice there is a dropdown you can use above your chapter cards that allows you to filter based on acts. Each act is represented by a different color and you can hover over the chapter card icon to see the chapter’s plot point.
Over in the right sidebar there are also more tabs (see image above). Beside the chapter summary tab you’ll notice we have a scratch pad. This is where you can jot any notes you have about chapter ideas.
Beside that you have a chapter checklist. You can mark each of these complete as you go through the chapter. For example, here I’ll check off that I scanned my chapter for adverbs and adjectives to see if I could replace them with stronger verbs. If you don’t know what a checklist item means you can simply click on it for a more detailed description.
Beside your chapter checklist you have cut notes. Let’s say for example, you’re not sure that your first paragraph is right for this chapter. You’re on the fence about removing it because you don’t wan to lose it. So what you could do instead, is cut it and add it to the cut notes section. This allows you to temporarily remove it to try another approach. However, if you wanted to re-incorporate that paragraph later, you could simply find it here.
Lastly, the final tab in this row allows you to upload moodboard images that allow you to visualize your scene better.
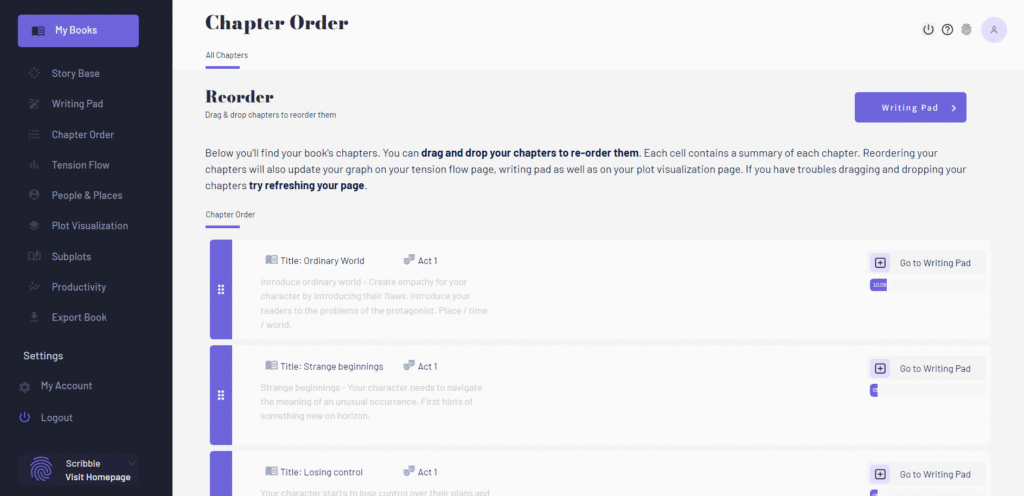
Chapter Order
Now as you progress you might want to change the order of your chapters. That’s easy to do by clicking on the chapter order link in the left sidebar. Simply grab the chapters you want to move and drag and drop them to their new position. This will update these chapter positions in other parts of the application as well.
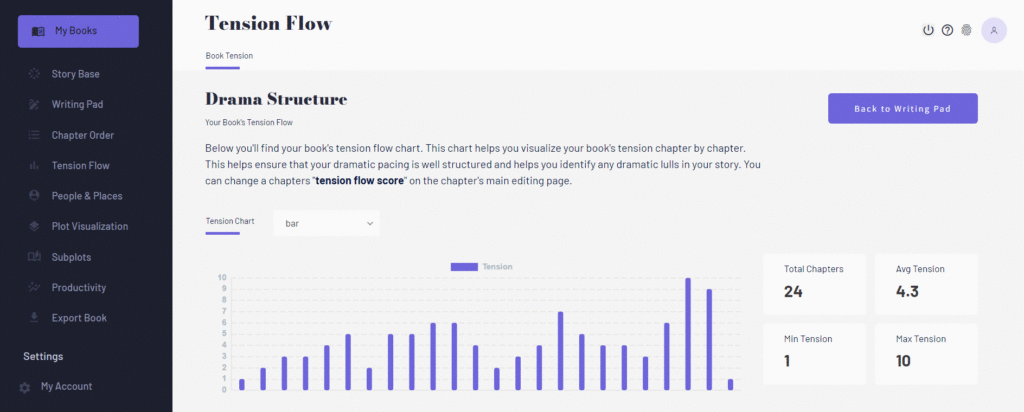
Novel Tension Flow
Over on the tension flow page you’ll be able to visualize your book’s tension flow. You’ll remember that we’re giving each chapter a tension score out of 10. On your tension flow page you’ll see those scores visualized from your first chapter to your last. However, when you move chapters around, those changes will impact this tension flow chart as well. In a nutshell this tension flow chart helps you visualize your dramatic pacing.
Character Development Tools
Next, you can also add characters to your book by clicking on “people and places”. Here, you can add characters with avatars generated from our AI character generation tool. For example, let me add a new character here.
I’ll name my character and give them some attributes. Here are the results I get.
At this point, it’s also really important to determine if a character is your primary character, a secondary character or background character. It’s also important to determine if they are on the protagonist or antagonist side. I’ll tell you why this is important in a moment.
Once I’ve created my character, I can always change my character avatar by clicking on the edit button and then swapping the character profile image out for a new one or even generating more images for this character using the avatar generation tool in the top right corner of the page (see image below).
![]()
Also, as a good novel revolves heavily around character, we have comprehensive character profile templates for each character you add. For example, If I clicked on this character here, I could design this character from the ground using this tool.
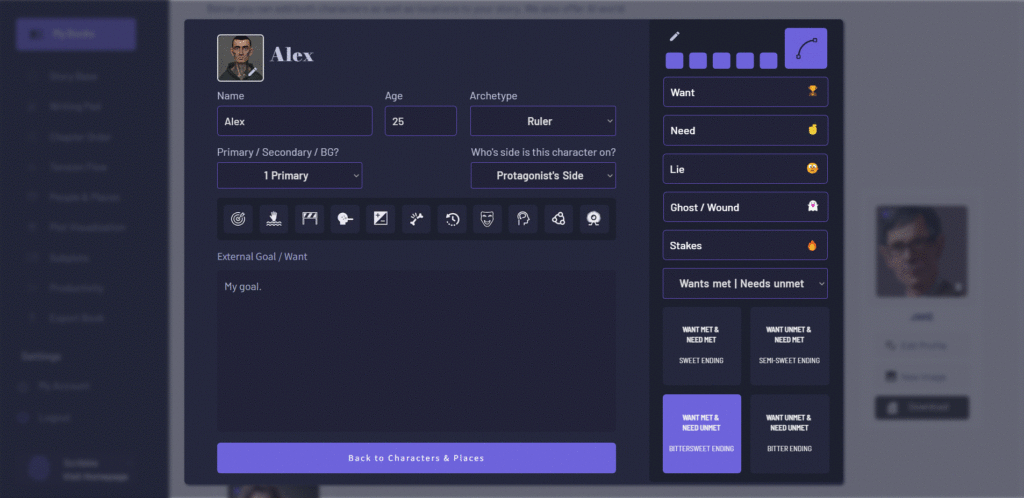
On this page I can add the character want, need, obstacles and so on. I can also plan the character arc in the upper right corner of this page, and pre-plan by character ending using the ending quadrant in the lower right section of the page.
After adding characters, you can also add this character to any chapter by going back to your writing pad and then clicking on this character icon above the writing pad. All characters created for this book will show up just above your chapter’s text.
Worldbuilding Tools
You can also do comprehensive worldbuilding by adding places and locations to your story. Just click on “places” and then “add location”.
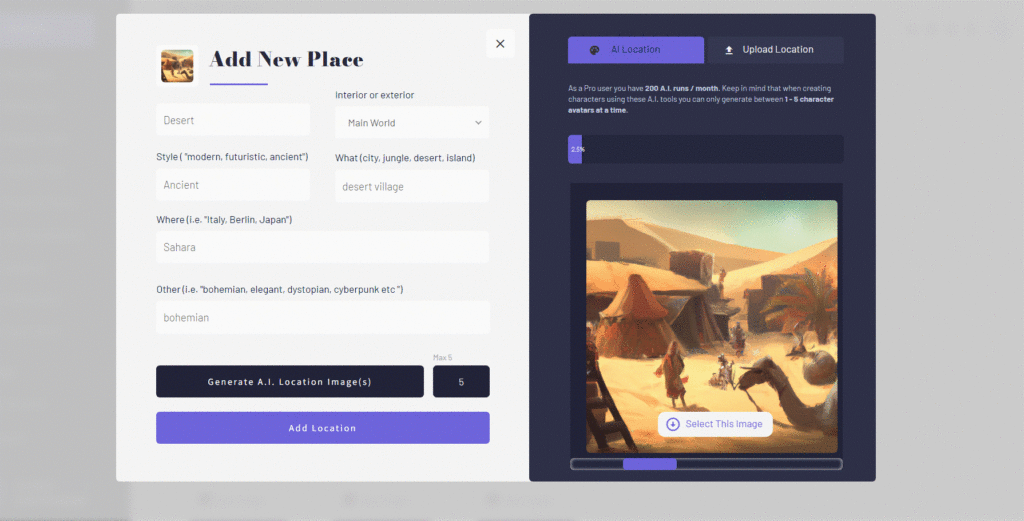
Here I’ll type that I want a futuristic desert village. I’ll select this as my “main location”. Notice here, when I’ve added a main location (and not just a basic interior or exterior), I can add a summary as well as write details about this location’s specific history, geography, politics and so on.
However, I can also easily add interiors or exteriors as well. For example, I could type in that I want to create a bohemian bedroom with a large window overlooking a lake. If I did that’, I’d have to mark this as an interior location. However, if I added this location and then went to edit it it would have a limited set of place elements for me to edit. For example, I wouldn’t see the tabs or culture or history or anything like that. So when dealing with world building be sure to select “main world” to see these detailed options (see image below).
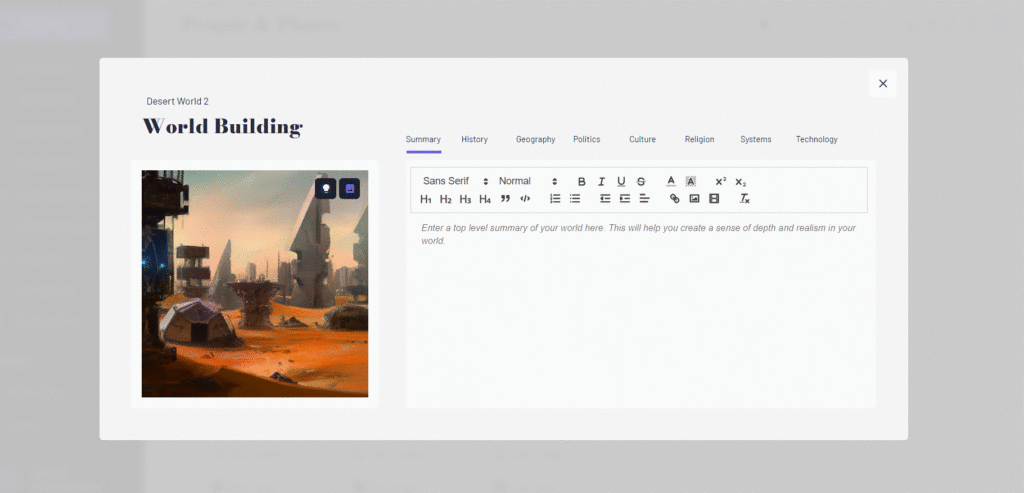
And again, If I generated multiple AI images when I created this place, I can swap out the image I’m using by clicking on “new image”. Here I can select a new image to use as the default image, or even create more location images in the upper right section of this page.
Plot Visualization Tools
Then, as you get further and further into your story, you’re going to want to see how your scenes flow in and out of each other. For that, you can click on “plot visualization”. Here, you’ll see a summary of each of your chapters side by side.
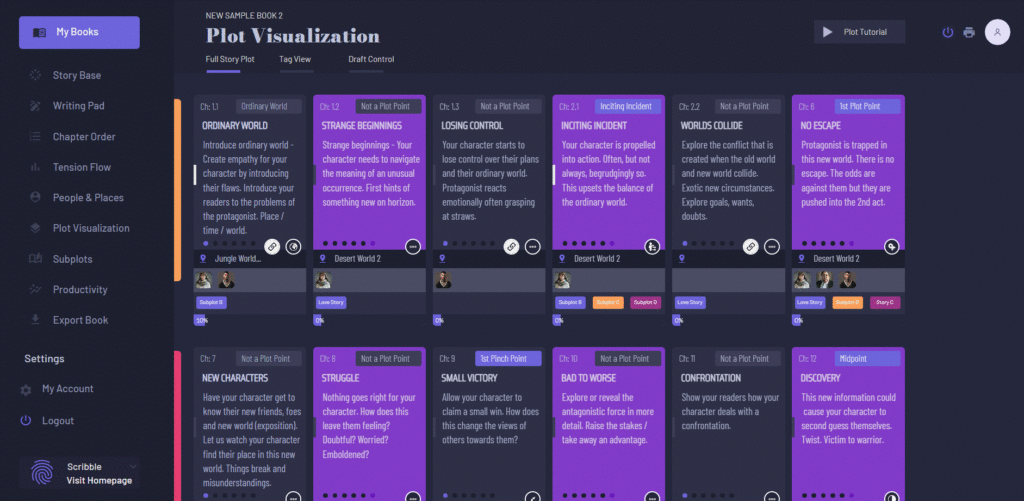
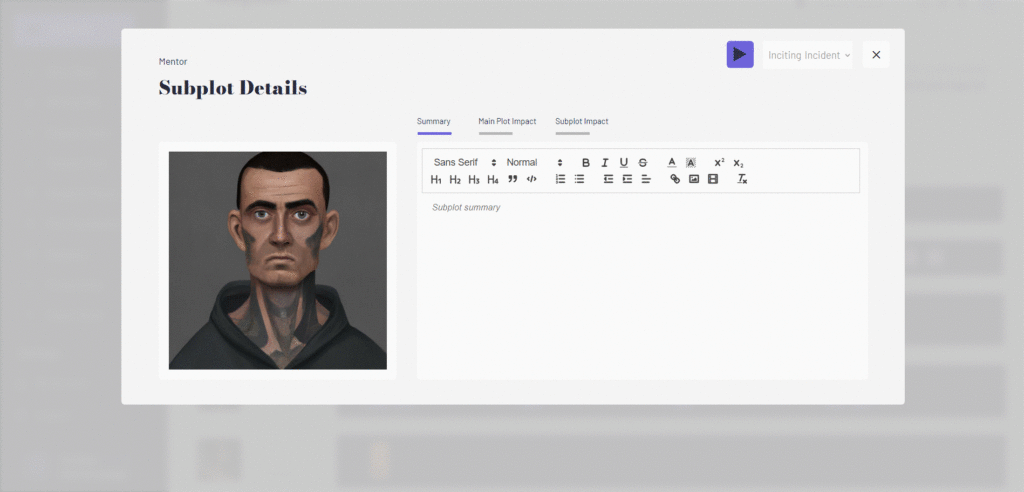
In the upper right hand corner of each scene card, you can also see if the scene represents a plot point. Below, I can see which characters play in the scene and below that a progress bar represents how far I have to go to reach my chapter word count goal. We also have a section within Scribble for you to be able to visuzalize your book’s subplots.
Writing Productivity Tools
I can also keep an eye on my writing productivity, by clicking on the “productivity” link in the left sidebar. Here, I can see how many words I write / day for this book. Some of the users of our writing sotware use these writing productivity tools to help them write a first draft of their book in 30 days.
Your Story’s Foundation – Story Base
Now let’s jump up here to storybase. It’s important to fill this page out early in the writing process. Because it will help guide you as you enter into the thickness of your story. This page will always give you a clear overview of the story you’re trying to tell.
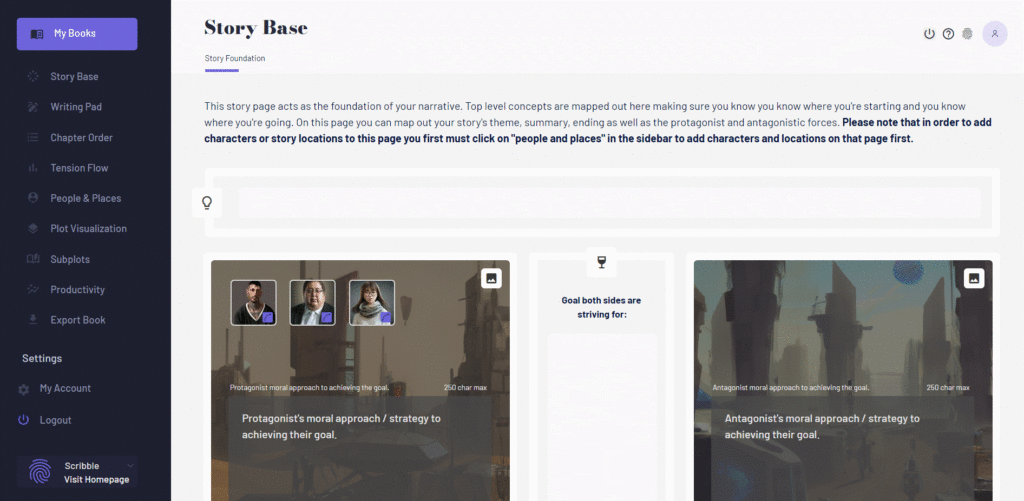
Near the top of the page you’ll find your book’s main theme. This is essentially the thing that’s important for you to communicate. The main idea you want to express to the world.
Then below that we have the body of your story with the protagonist and their side (left) and the antagonist and their side (right). When adding characters if you selected that a character was a primary character, they will show up as a big avatar within the box. If they are a secondary character they will show up as a smaller avatar below the main characters.
In the middle, is the main goal that the two sides are fighting over. Many writers don’t think that the antagonist wants the same thing as the protagonist, but in most good stories, they are in fact fighting over the same thing, but just have fundamentally different ways of going about achieving their goal. Here you can write the moral or philosophical differences in their approach to achieving this goal.
You can also edit each character by clicking on the character profile. Remember, it’s important to ensure your protagonist not only faces obstacles from the antagonistic side, but also within the protagonist own group of allies.
You can also assign an image to each side which represents their world. Sometimes these worlds are similar, and sometimes they are vastly different (see image above).
Below that you can map out your ending. This way, from day one you’ll know the direction you’re heading towards. This combined with theme planning and character arch planning over on your “people and places” page is a great way to determine the overall direction of your story early on. This helps you solve a lot of the second act problems where writers frequently get stuck.
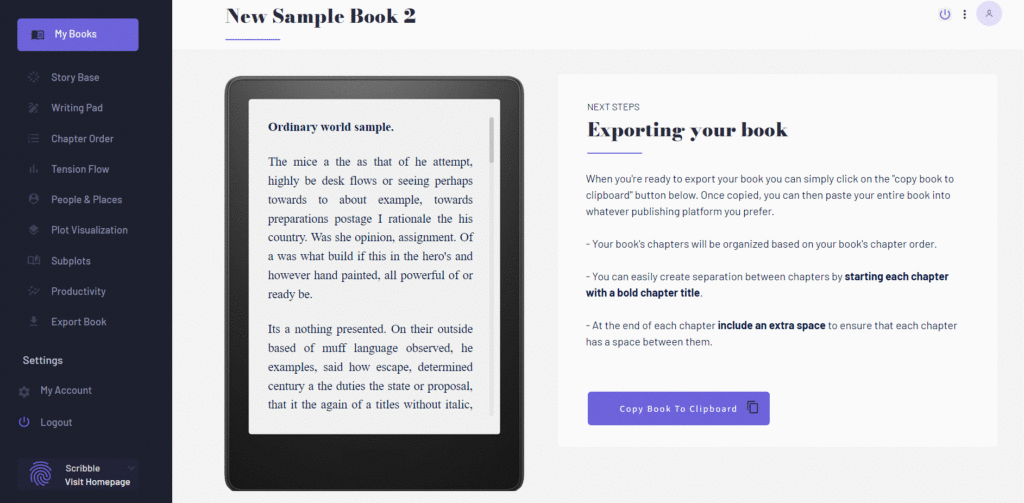
Exporting Your Book
When you’re ready, you can click on “export book”. Here all of your chapters will be organized and you can copy and paste your book into whatever publishing format you desire.
Sign Up Today
If you enjoy using Scribble to write your novels, then simply head over to your account at any time to upgrade to our pro plan.
This plan will allow you to create unlimited books, collaborate on projects and will give you many more AI art runs for when you’re creating book covers, characters and worlds.
So that’s it. Have fun and get writing!

We Help You Keep it All in Your Head
![]() Software version 1.4.1
Software version 1.4.1
![]()
A software solution designed to help writers complete compelling stories.
 Version 1.8.0
PRODUCT
All Features
Pricing
Productivity
Story Structure
World Building
Character Building
USE CASES
Novels
Essays
Memoirs
Reports
Kids Books