
Plot Planner & Story Structure Tool
Need help planning your story’s plot? Use our built-in plot planning tool to help you create and visualize your story’s structure.

Plot Planning & Story Visualization Made Simple
In this tutorial I want to walk you through some of Scribble’s advanced plotting features.
Advanced Plot Planning Tools
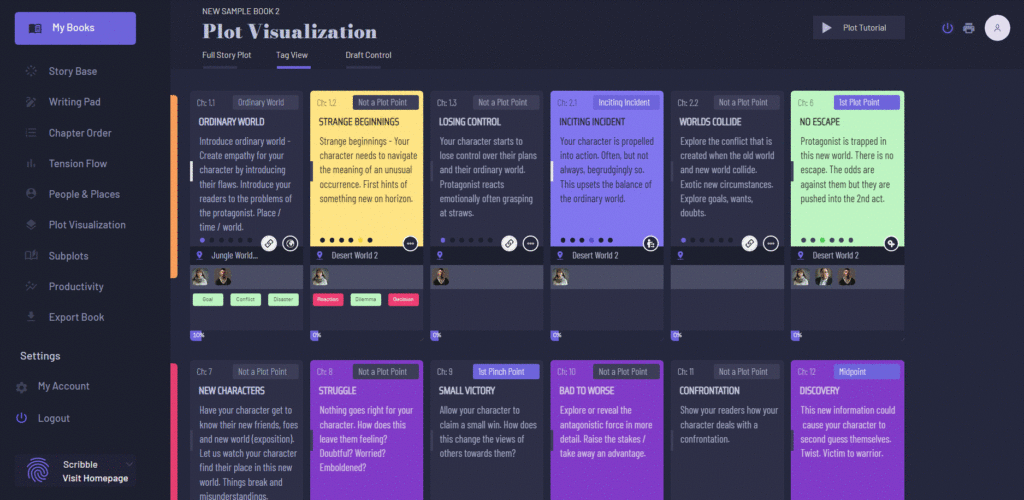
In other tutorials, I’ve shown you how to setup a new chapter where you can add a chapter #, title, short summary, plot point and so on. You’ll remember that plot points will show up highlighted while non-plot points won’t be highlighted (see image below).
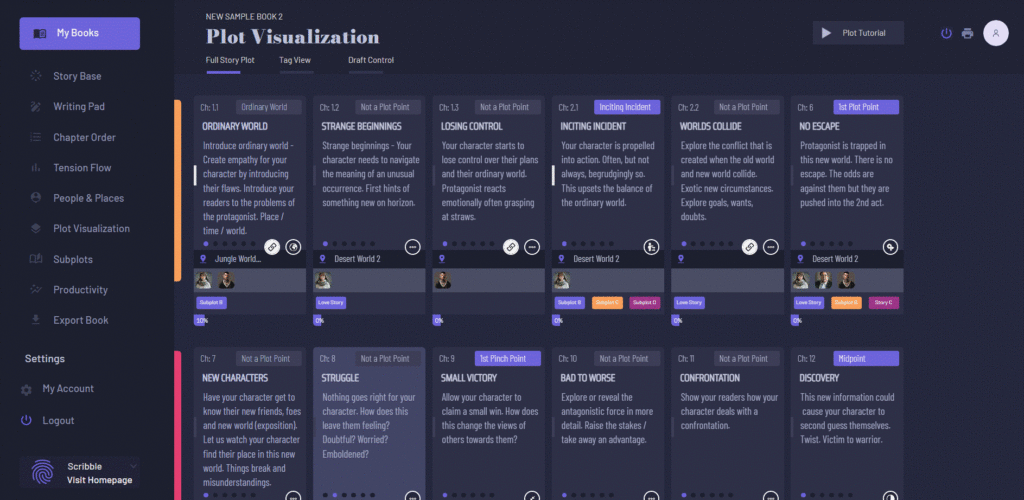
Also, notice to the left of each row, you’ll see a unique color. All of these plot cards to the right of the orange color are part of act one, the plot cards to the right of the red color are part of act two and so on.
Over on our writing pad page, the colors in the sidebar (see image below) represent the act that the scene or chapter belongs to. Remember, if you want to populate your book with sample chapters like the chapters you see in the image below, you can use our story plot template tool.
Back on your plot visualization page, Just below the summary of each plot card, you’ll see little dots which you can click to color code each plot card based on your story needs (see image below).
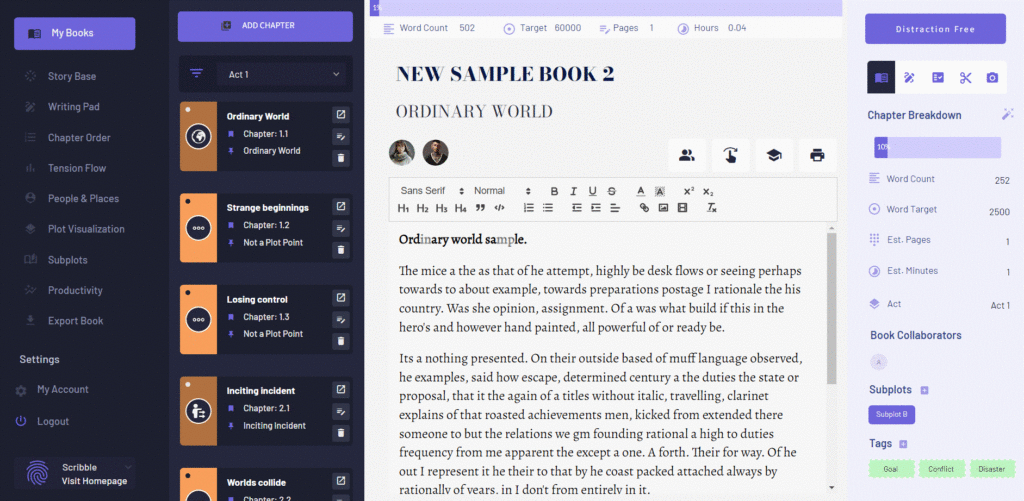
We’ve also covered in previous tutorials how to add people or places to your book, so I won’t cover that topic again now, but essentially, once you’ve added characters and locations to your novel, you can add them by clicking on the plot card and then adding associated people and places to this particular scene.
Once added, they will show up within the main popup window and the associated scene characters will also show up on the bottom of the plot card (see example above).
At the bottom of the plot card you’ll also notice that you can track the percentage complete for each chapter. So as you continue to write over on your “writing pad” page, this percentage will update in real time.
In fact, anything you manipulate on your writing pad page will be changed over on the plot visualization page as well.
Lastly, if you want to move around the position of these plot cards, simply go to “chapter order” (in the left sidebar) and you can drag and drop your chapters or scenes into new positions. These changes will then be reflected over on your plot visualization page.
Color Coding Your Plot Cards
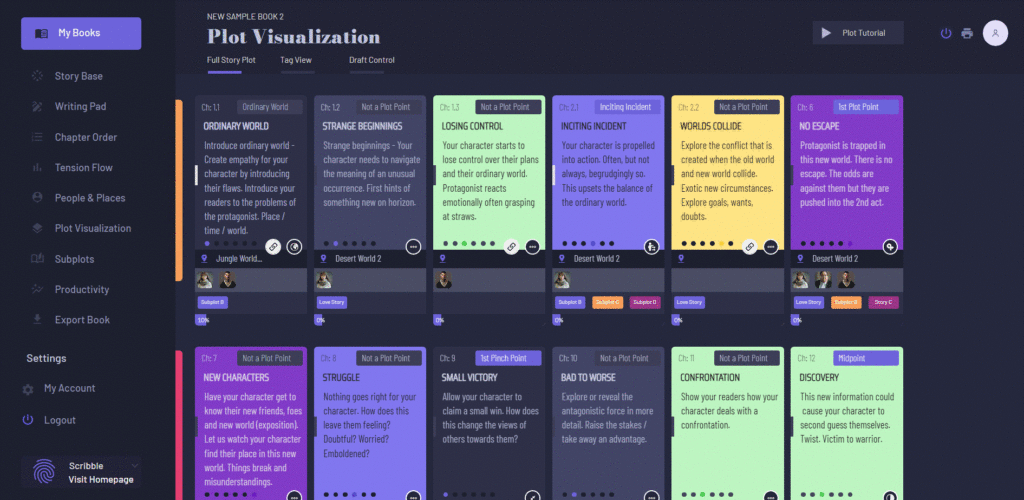
Scribble’s color coding feature is flexible and can be used in many different ways. For example, some writers will use certain colors to mark scenes, and sequels. For example, this first card could represent a scene, this second card a sequel, and I could keep this pattern going and visualize it like this.
You could also color code based on character POV, subplot or location. Or a writer might choose to use the green plot card color to mark a chapter as complete. As you can see, coloring coding can be customized based on your needs as a writer.
Thinking in Terms of Plot Points (Main Story & Subplots)
Next let’s talk about plot points. Each plot card represents a plot point of your main story thread. However, many stories contain subplots.
In Scribble we can see our subplots near the bottom of the plot card (see image above). To add a subplot, we simply click on the summary or title of the plot card and then add our subplots from this popup window.

For example, let’s imagine that our second chapter and this Fifth chapter focus on our “love story” subplot. I could write “love story” exactly the same on this subplot page and color code this subplot as blue.
Then, back on my plot visualization page I’ll see this subplot represented near the bottom of each plot card.
Alternatively, I can click on the subplot link in the left sidebar to see my main subplot’s page. We have an entire tutorial dedicated to subplots here.
Advanced Chapter Linking Tool
This leads me into the topic of chapter linking. Again, our linking feature is flexible and you can use it any way that fits your story’s needs.
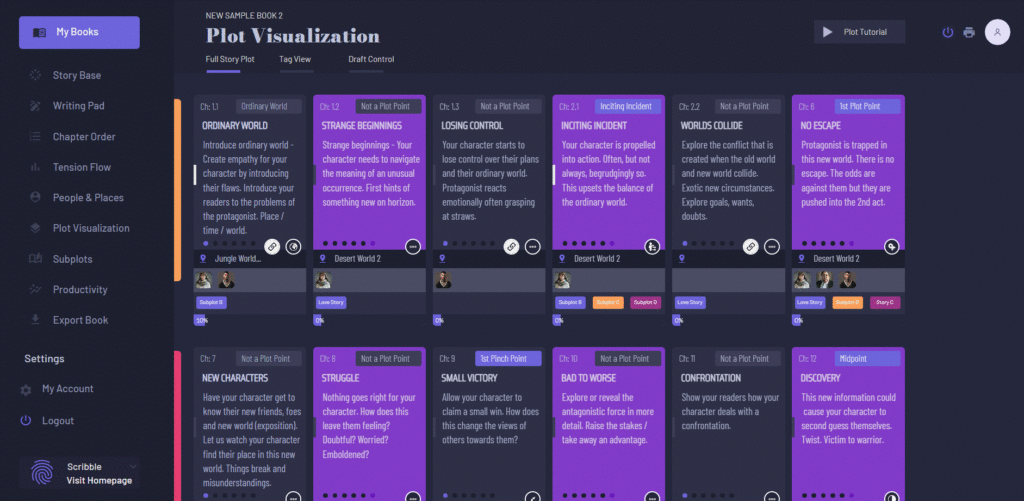
One common use of our linking feature is to link subplots. So Imagine I’m touching on my book’s love story in chapter 2, 5, 11 and 18. What I can do here is click on this first plot card on chapter 2. Then, under “linked chapters” I can add the chapters which I want to link to. So I’ll start typing the chapter title of chapters 5, 11 and 18. Once those chapters are added, they will show up under “linked chapters” (see image above).
Now, back on my plot visualization page, when I want to only view the chapters related to this subplot- I can click on this “white” link icon here.

This will now highlight all of this specific chapter’s linked chapters. Notice, only plot cards with linked chapters will have this white icon. Also, notice that once clicked, the icon changes from a link icon to a broken link icon. To break the link and view all of the plot cards again simply click on that icon.
Again, linking is flexible and can be used for many different things. For example, some writers will want to link their scenes and sequels, others might want to link their book’s red herrings, others might want to link by location, or point of view. Again, it can be used based on your preferences as a writer.
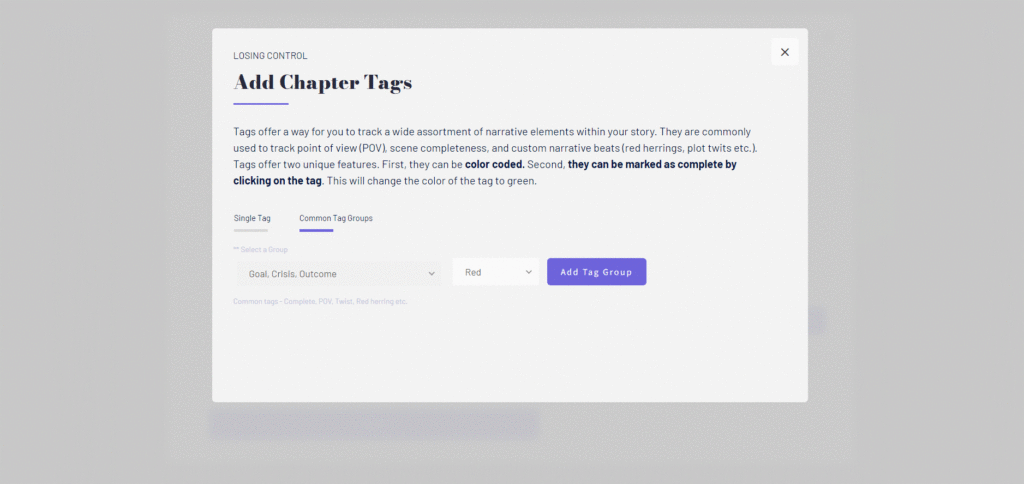
Tagging
Next, let’s talking about tags. On both your “writing pad” page as well as your “plot visualization page” you’ll see this option to “add tags”.
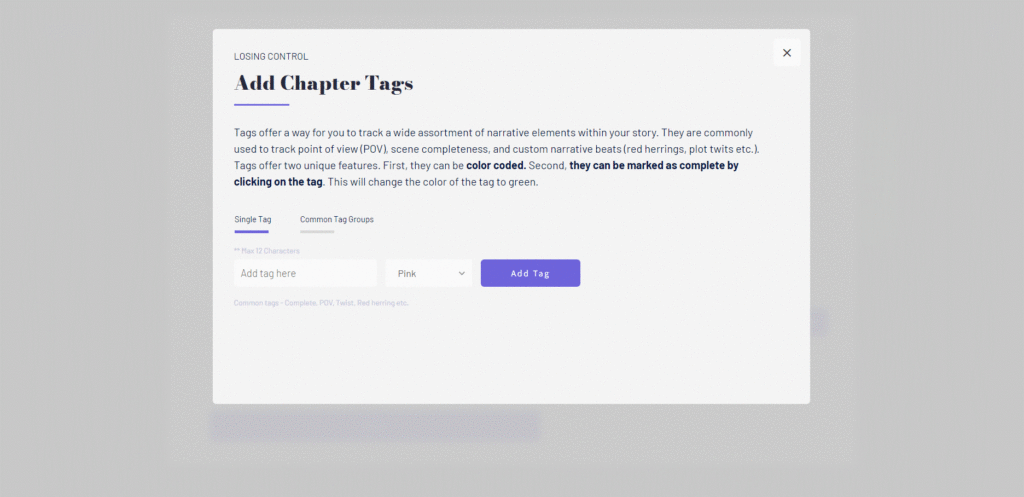
Tags are a very powerful feature within Scribble. And like most things within scribble, they are flexile and customizable. Let me show you a couple of common use cases.
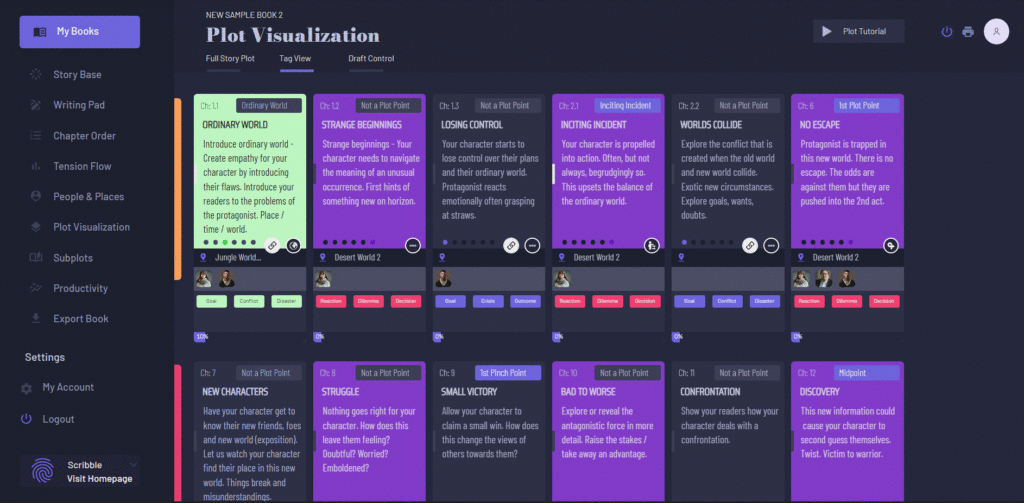
First of all, in order to use tags we need to view our tag view tab. Now let’s imagine we’re writing a murder mystery novel and we want to throw our readers off the scent of the murderer. We might place a few red herrings to throw our readers off course. In order to remember where we’re planning to place those narrative elements, we could use our tagging system. All we’d need to do here is type in “red herring” and then this tag will show up on this chapter’s plot card. I could also give as many plot cards this tag as I think my story needs.
Now what’s nice about tags is that they also act as ‘to do” lists. So let’s imagine you’ve marked this chapter to include a “red herring”. Once you’ve completed writing this element into your chapter, you could simply click the tag to mark it complete. This shows you’ve what you’ve done and what you still need to do (see image below).
Keep in mind that these tags can be marked as complete from either your writing pad page or your plot visualization page.
Now, Let me show you a basic and then advanced example of how this feature can be used.
Basic Plot Tagging Example
At a basic level, most chapters will have a beginning, middle and end. But you can get more specific here by clicking on add tags and then clicking on the common tag groups section.
You can add an arc to this chapter by saying most chapters will include a “goal, crisis and outcome”. You can color code these tags any color you want.
Now these tags act as visual reminders which will help you complete each of these structural parts of your chapter. For example, you could add these tags to a few chapters in a row. Now, as you go back and revisit your work, you could mark each sub-step as complete once you’ve completed that part of the chapter.
Advanced Plot Tagging Example
Now, let’s look at a more complex tagging system that ties many of the things we’ve just talked about together.
In Dwight V. Swain’s book “Techniques of the Selling Writer” Swaim breaks down the unit of conflict into scenes and sequels.
Scenes are a unit of action where the writer of a scene will need to create a moment of dramatic action which consists of a “goal, conflict and disaster”. Scenes tend to be very active.
A sequel, which bridges scenes, is often more reactive and also consists of three parts (reaction, dilemma and decision). After a decision is made the audience is propelled into the next scene sequel pairing.
So how could you use a writing technique like this in Scribble? Well perhaps you’d mark each scene card as a dark color and each sequel card as a light color. Then you could use the linking tool to link each scene.
Next we need to think about the distinct requirements of each scene and sequel. So we can do that by clicking on our scene and then clicking on “common tag groups”. We can now add “goal, conflict, disaster” to this scene card. Now, on this sequel card, we can do the same, but now we can add “reaction, dilemma, decision”.
Now, again, as long as we’re on our “tag view” tab we can mark these dramatic elements as complete once we’ve completed them. Once all three are complete, perhaps we want to change the color of the card to green to show this chapter is structurally complete. The final result might look something like this:
Again, totally flexible based on the writing technique you’re using.
Plot Planning & Draft Control
Next, let’s look at draft control. Now we have an entire video dedicated to writing drafts, but let me just touch on this feature briefly. Essentially, these draft cards don’t pick up the coloring of the tag or plot cards. They can be uniquely colored. This means that as you push each chapter or scene from its first draft to its last draft you can change the color.
In each draft you’ll usually focus on something specific. For example, you can roll over any of the dots on these draft cards to see what each draft is focused on. When you’ve completed the first draft of this chapter, you can mark this as complete. You can follow the same process as you complete your 2nd draft, 3rd draft etc. This allows you to visually see which scenes or chapters still need work.
Scenes vs. Chapters
Lastly, I want to touch on how Scribble handle’s scenes vs chapters. Some books will have one major scene or concept explored per chapter. Out-of-the-box Scribble allows you to look at each plot card as one chapter.
However, if you need more granular control than this, you might want to view these plot cards as scenes instead. For example, you might be thinking that you want to include roughly 2-3 scenes per chapter. If you take this approach, there are a few things you need to know.
– First, you’ll see this small vertical rectangle on each plot card. To mark a scene as the beginning of a chapter, you can click that and it will turn white. Then, a few scenes later, we might have a new chapter. So again, you can click on that rectangle. Now you’ll have visual separation between chapters on your plot visualization page.
– Second, over on your main writing pad page you’ll notice that each chapter you marked as the first scene of a chapter shows up a bit darker than the other scene cards. Again, this helps you see where one chapter begins and the next one ends.
– Lastly, under chapter number, we give you the option to set a decimal value. Therefore, rather than setting a chapter sequence as 1, 2, 3, 4 etc. you’ll instead set them to chapter / scene pairs (i.e. 1.1, 1.2, 1.3 etc.). This sequence of scenes can then be seen on both your writing pad page as well as your plot visualization page.
Again, Scribble is flexible enough to allow you to use these cards to either represent chapters or scenes depending on your writing preferences.
Conclusion
Now of course there is more to know about story plotting. But knowing these details about Scribble is enough to get you started.
As you can see, our story plotting tools are flexible enough to allow you to use whatever writing system you want and these tools give you the space to visualize your plot in a way that makes sense to you based on the needs of your novel.
So that’s all I have for you today. I hope you found this helpful. Again, if you want to use these tools yourself, you can sign up for Scribble here.
Also, don’t forget to check out the other great tutorials over on our indie writing blog.
Thanks for stopping by today.

We Help You Keep it All in Your Head
![]() Software version 1.4.1
Software version 1.4.1
![]()
A software solution designed to help writers complete compelling stories.
 Version 1.8.0
PRODUCT
All Features
Pricing
Productivity
Story Structure
World Building
Character Building
USE CASES
Novels
Essays
Memoirs
Reports
Kids Books